Showing posts with label Sewing. Show all posts

May 11, 2013

Zelda's Link Costume

I was looking through some old photos and realized I had never posted my Link costume that I made for my son last Halloween. He loved it!  I had so much fun making it.  I just used fleece so there was no reason to hem.  Very easy! I used a pair of pajama to make the pants and undershirt the correct size.  I bought the green t-shirt and made the belts and the boot tops out of canvas. The buckles were the same material, just painted with gold paint.  The hat took some trying on... many times to get it just right.  I sewed the ears to the hat so they were in the correct place. 

The fleece was also great because it was warm on a cold night!  The shield and sword were from the dollar store and I panted them to match the shield and sword from Ocarina of Time.


Shop Amazon -There's Still Time to Make Mom's Day with an Amazon.com Gift Card

April 21, 2013

Shoulder-less Shirt Re-Make From A Thrift Store Find

 I have had a couple of tops that I saw on Pinterest on my Sewing Inspiration board on Pinterest for a while now and have been thinking about how I can make a shirt like these.  I love the cut out shoulder and decided I can do this myself. 
 

So, I started with this shirt... I will look for a more appropriately shaped on my next trip to Salvation Army, but this one will do for now.  It is a crepe-y kind of material.  Not sure what to call it.

So, I started at the collar and moved out about 1/2 inch from the collar and cut away the shoulder and the top part of the arm, keeping the underarm connected.  I left the 1/2 inch so that I could hem it right up to the collar.  I did a rolled hem the whole way around the section that I cut out.

 
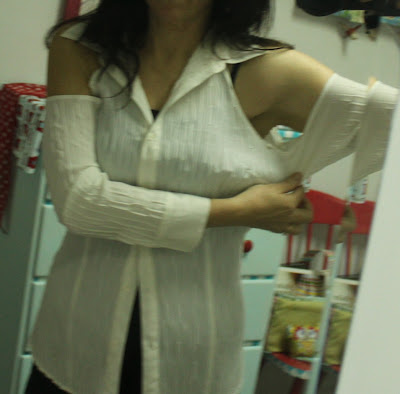
Then I tried it on and realized that the underarm was too big on me.  You can see that here.
 
So, I took the arm and the side of the shirt in. It is a size large and I am a small.  In hindsight, I should have taken it in first to be sure it fit.  So, I cut away the excess material that I had taken in.  It showed through the shirt too much to leave it.  Then I sewed the sleeve to the bodice from the arm pit up about 3 inches both on the front and back.
 
This is how it turned out and I really like it, but I will still look for a dress that I can make like the first picture above.   Maybe I should have combed my hair or put on some make-up before taking pictures to share with the world.  Oh well, au natural it is.
Shared on


October 13, 2011

Dressmaker's Pin Cushion

Hi, Followers!  I had such a good time with this dress form pin cushion that I had to share it right away! It was so fun and so easy.  Of course, my seams weren't perfect, but next time I will do better.  I have embedded the video below with instructions!  If you would like the pattern, go out Kim and Kris on The DIY DISH.  

If you enjoy this video and instructions and you want to make the two-tiered cake or the owl pin cushion also in the photo, go back through their archives because they make a new pin cushion each season.


Enjoy! 

May 16, 2011

Handmade Tablet Cover and Carrying Case

I recently became the owner of a wonderful little piece of technology that I just love.  My Acer Iconia A500 tablet!  What a great idea these things are!  Anyway, if you have a tablet, you know they are very easy to sit down just about anywhere.  That anywhere may be a counter top that is wet, or dirty.  I looked online for a cover to protect the the back and pad the sides of my tablet, but couldn't really find anything I loved, so I decided to design my own.

I made two, but the first one wasn't really working for me.  After that trial run, I came up with something else that I really think works perfectly for me.  The edges are velcro'd so I can remove it from its cover and use the camera easily.  I also came up with a carrier that doesn't look so techie.  It looks more like a handbag.  The good thing about making my own?  The case and carrier, coordinate with my camera bag and my camera strap which I also made!

I started to make a tutorial, but honestly, I was winging it and it was WAY too many steps.  I guess I'm posting this so that you can use it as an idea of how to make your own.  If you can construct things from fabric, it won't be too hard.  If you have any questions about how I constructed it, you can email me at

t DOTpixeltrash AT gmail DOT com. And I will try to help you with it.

This is the padded cover.  The left and right sides are stitched in place, so they hold the tablet perfectly.
The top and bottom sides velcro around the back so I can tighten them just as I need them.  I also made a hole under the velcro tab on the right upper side so I can plug it in without removing the cover.


See the velcro tabs on the left and right? 
 I also included a handle of sorts to make it easier to hold. 

There is thicker felt inside the top of the back.  I did that so that it will sit at more of an angle on the desktop.

This is the carrier.  It is lined with a fusible fleece to protect the tablet.  I made it from a white canvas.
 I added two pockets to the back- one to store the cleaning cloth and one to store my cell phone.

Here is what it looks like with my tablet in it.  Fun right?
This is my camera case that matches....  
I am going to try to draw some instructions for this project, but can't promise when I will get them done.

Hope you are having a great week!

I shared this at

The Girl Creative

Acer Iconia Tab W500-BZ467 10.1-Inch Tablet (Silver)Acer Iconia Tab W500-BZ467 10.1-Inch Tablet (Silver)

Gizmo Dorks Hard Shell EVA Case (Black), HDMI Cable, and USB Cable with Carabiner Key Chain for the Acer Iconia Tab A500Gizmo Dorks Hard Shell EVA Case (Black), HDMI Cable, and USB Cable with Carabiner Key Chain for the Acer Iconia Tab A500

March 5, 2011

Pillow Talk...

So I made some more pillows with my crazy sewing technique.  I think these pillows will be displayed in my living room for Spring.  I do love how they turn out and I may also make some for my bedroom in some tans and blues.


Fun and SPRINGY, don't you think?  I am posting this here....

Blogger's Pillow Party

February 5, 2011

Sewing Room Redecorated

I think I'm finally as done as I'm going to be on this room!  Well, there is always room for more art on the walls and perhaps new carpeting, but for now... it is done.  Months ago I decided to start this project and then only had a few things left to do and didn't do them until this weekend.

The closet doors were those hollow sliders and they were ugly and brown.  I removed them!  You can read more about the closet makeover on yesterday's post if you missed it.
Here's what the closet looks like now....


So, following is the room as it is now.  I tried to take a picture from the door, around the room, and back to the door.  It was a fun project and is very whimsical and hand-crafted!

This is what you see as you walk in the door.... 
I painted the desk, topped it with a wider board, covered that board with heavy wrapping paper.... (the wine bottle is not wine although I wish I had some right now.... it is kitty catnip... called Meow Merlot).  Admittedly, this back wall could use more art on it, but that will happen as I find the right things for it.
   
 Made a skirt and cushion for the chair, made and ironing board cover and the basket behind the ironing board which houses my sewing books and magazines.
This is a close-up of those projects from a previous post.
 I also painted the mirror which is above the sewing machine.

 Around the corner we go.... I painted the dresser which holds my extra fabric, buttons and fillers.  Each drawer is lined with the wrapping paper and has different colored insides!  You can see more about the furniture painting & chair coverings and ironing board cover....HERE.
Here's the dresser.... Love how it turned out!
I made this sign which says "My Happy Place" and the owl pin cushion... and the cake plates.  Oh.. and the hearts from salt dough.
 Here is the closet I turned into a cutting area this weekend.  I'm loving it!!!  In this picture, I made the coffee filter puffs, the pillow, the pictures are scrapbook papers in frames with 3D stickers on the outside of the glass. 
I used a lid from one of the metal jars on the right to create the scallop near the ceiling. I traced it and then painted the ceiling and scallop red.  I then traced the edges with a Sharpie so it is outlined in black.


I also made the pocket organizer on the back of the door.  It is nice because when the door it open, it is right beside me where I cut my fabric, so I can have all of my tools in the pockets rather than on the table surface.

It was a lot of work, but I get inspired to create while I'm in this room, so I guess it was all worth it!


Blog Widget by LinkWithin

Past Posts

FEEDJIT Live Traffic Feed