Today is the REVEAL!!! After you read mine, go over to the Inspired Room and see the projects the other party people have finished!
***********************************************************
My pool house changing rooms are DONE! I did it. Call me a procrastinator NO MORE!
You can see the BEFORE photos here. It is truly amazing what a coat of paint & some spackling can do!!!
We have two changing rooms with a set of shelves in between. I decided to make a girls' changing room and a boys' changing room. I NEVER get to do cute girly rooms, so I love doing a girl room and it is my favorite!
The GIRLS' Side
So, to begin, I chose a pretty LIGHT blue called Cascade Falls by Dutchboy. I love it. Soft and summery. I had found a shower curtain at Salvation Army that I thought I might cut up and use for fabric, but this was a way better use for it. I paid $1.99 for it! Here it is below...
Remember those UGLY mirrors??? Look how sweet they look in white!
I sewed this skirt for under the benches, made the pillow cover out of a pink striped valance I from Salvation Army and some fabric I used to make the headband hanging on the hook.
Notice the white floor? Everyone thinks I'm crazy, but I love it white. I figure if I don't like it, it is easy enough to repaint! It was ugly and just concrete. I got floor paint with a sand added to it so that it isn't slippery for wet little feet!

Close-up of the mirror...

I got a spring-tention shower curtain at WM for $11.95.


I had some cute frames that were black that I got at The Christmas Tree Shops and spray painted white. They are 12x12 and were supposed to be used for record albums.
I did the middle layout in Paintshop Pro and matted it with some pretty scrapbook paper.

This is another of the tention rods used for hanging beach towels. Regular towel rods are too small for beach towels, so this will work better. I still have to get one for the boys' side.

There are three lights that were just bare lights. I got these at Walmart for both the boy and girl sides.
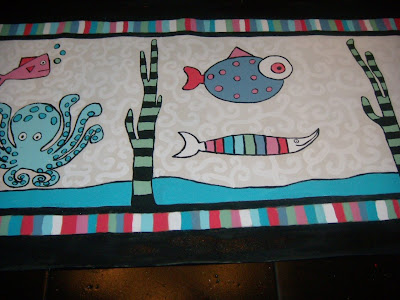
The mats cost me nothing extra! I had some outside furniture fabric that I got at WM (imagine!)for $2 a yard. It was tan with a rubbery waterproof plastic on the back. Perfect because it doesn't slip too much. Here it is on my kitchen floor. I hemmed the edges and then painted it with a roller in white. Then I painted it with acrylic paints and Mod Podged it to seal it. After that dried, I sprayed it with a different sealer. I'll have to post the name of that if anyone wants to know.

The BOYS Side!
I had a Pottery Barn shower curtain that was in my bathroom in San Diego, but it didn't fit into our house here. I kept it and wondered why. Now I know! It looks really cute in the boys' room. This (sort of ugly) print that is on the wall was left behind by the previous owners. It didn't match my decor inside (thank God) but I thought it was pretty boyish and looks cute with the Vintage Turquoise in the boys' dressing room.

Here's V. using the room. He has an inch worm on his finger.

The pillow and curtain under the bench are also made from 2 light green valences I got at Salvation Army. I put vintage buttons on each of the tabs. Both skirts are velcroed on so I can take them off and wash them when (not if) they need it.
Here's that mirror! Soooo much better!
These were little frames I got at the dollar store. I painted them all white and decoupaged the inside with scrapbook paper. I will show more of that in a later post.
This is the other mat I did for the boys' room. If you click on it, you can see it bigger.
The Middle Shelves
These are the shelves that you see when you open the pool house door. I've painted them green. The actual paint color is Silvery Green and it is a Dutchboy color. I had it mixed at Walmart. All of the trim, ceilings and benches are painted with a glossy white.
The baskets are awesome! I got them at Walmart 2 for $5.50! Awesome price and they are made of a nice nylon material that can be easily wiped down. This is where I store a lot of the extra stuff that I put on the table by the pool. We moved the pool ladder and stuff to another storage area in another garage.
The white floor!


A close-up of the baskets with labels....
The old light was just a lightbulb. This one was CHEAP at Lowe's. I spray painted the metal part white instead of the gold that it was. We had to have one with a chain pull, so there weren't a lot of options.

Check it out! Only $108 spent to re-do that bad chipboarded storage space and to make it a pretty, summery hangout. I really want to put a TV in there... or maybe a computer line. I could blog from there very nicely.
Hope you enjoyed seeing my project as much as I enjoyed showing it. My balls of my feet are bruised from painting the floors while stooping. My shoulder is aching from painting the ceiling, but the aches and pains were all worth it!


.jpg)


