February 28, 2010

Today's Crafts

I played in my craftroom this afternoon and made quite a few things. I've dubbed my craftroom "My Happy Place". That way, when I say, "Mommy's going to her happy place." I have a place to go. I even made this sign for the door today!
I have seen lots of bloggers out there making apothecary jars from stuff they already have. Love it! I decided to pull out some of my stuff and make myself one for my craftroom shelf. This little jar is one I found at Salvation Army for $.50. The candle stick is from the dollar store years ago.

I used E-6000 glue to attach the two. You can get this in the craft department at Walmart.

Ta Da! How cute is that? Here it is on my shelf. I love the way it turned out.
I also made a few cards today, but you will have to go to my Paper Crafting Obsession blog to see them.
Have a great Sunday night!
Tami
February 27, 2010

Snowmen {Who Doesn't Love 'Em?}


I have created some new cupcake wrappers and posted them on my Food Art blog. If you would like to play inside on this snowy day, why not bake some cupcakes and use these pretty wrappers to decorate them? :-) Don't forget to send me links to your pictures if you do! There are many more than this one.

Snow Photos!

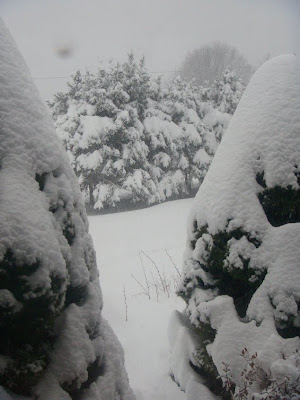
This is our snow yesterday. It is still coming down! It is crazy how much snow we're getting!
Off to do some serious sled riding! Have a GREAT Saturday!


I've posted some new cupcake wrappers that are free to print (for personal use) on my Food Art Party blog. The link is on the right. Enjoy!

February 23, 2010

A Project Finally Finished

I have had this project hanging on the back of a door for a while now, but never really finished it.


You see, there were some serious design flaws.... I had been using the rod from the top of my kids' easel for a long time and it kept falling off to the side because it had to be balanced on the wreath hanger in the middle. Of course, it wasn't until after I had done all of the following before I had one of those "DUH" moments. I thought, "Why didn't I just buy another wreath hanger at the dollar store and put one on each end?" Yes. Duh.... But that would have been too easy, so here's what I actually did.


I had my husband pick up a new dowel rod from Lowe's and I spray painted it light blue. I then attached some beads on each side of the wreath hanger using hot glue. Then I put beads on the ends of the rods to keep the "straps" from falling off. Then I hot glued some paper butterflies to the ends of the rod just to make it pretty.


Now it is all done and I've stored LOTS of papercrafting goodies in it. It is on the outside of my craftroom door for now. Since that door is always open, it is right in plain site from inside. I love how it turned out!


I may still go buy another wreath hanger at the dollar store. It could use the reinforcement when I put something heavy in one of the pockets.

If you want to see it close-up, you can click on the photo. I wish I could make the photos bigger in blogger. Anyone know how I can do that? If so, please leave a comment with that info. Thanks!


Tami

February 20, 2010

A Purse I Made and the Olympics

I'm amazed at the Olympics this year. Is it me, or are the speeds out of control? I worry for these people's moms. I can't imagine the first time my kids show me that they can do a half-pipe.
I think I'll ground them.

A word of advice.... if you find yourself hurling yourself through space, you should STOP.

Anyway, here's the purse I worked on last week. It is finally all done. Covered buttons and all.
I didn't have a pattern or directions. I just faked my way through it and I think it turned out pretty well. I've already had people say that they want one too. :-)

If you click on the picture, it should open larger to show more detail.

Speaking of crazy stunts.... Ahem... who do I ground? The one on top or his brother and Dad?
I need to nip this behavior in the bud! LOL!
Smarty pants!

Tami

February 19, 2010

I LOVE Scarves {and Purses!}

Amanda, of the awesome Kevin & Amanda blog, posted about her scarf collection. I love it (you should go check it out next).... and was thinking about all of the scarves I own. So, I told Amanda I would post mine too, so here it is. Hers scarves are the the cottony kind, and mine are the silky kind. I just love the fun colors in my closet. Can you tell I like black and white much???

I love to wear these in my hair (as a headband or to tie it back), around my neck or, my favorite way, to tie them on my purse. It just adds a splash of color when it is needed.

I also posted part of my purse collection below too. You will notice that there are even scarves tied to some of them....

PS... this closet is a really shallow one that is in a space on the back side of our shower (so you can get to the shower control stuff) and they put these bedspring thingies in there so you can store shoes in it, but shoes never really worked out very well on them because I have too many shoes and too many different kinds of shoes (a lot of boots... ahem... another collection.... SHHHHH!) so, I stored my purses in there. That worked out better for me. I didn't get a picture of the top purses because it turned out blurry and I didn't feel like running back upstairs to take another picture, but you get the idea....

Yes, I know this is a link, but I couldn't get it to paste any other way. Grrr!

And speaking of bad boot habits.... look what I bought today. Love them!


Okay... enough collections. I have others (like paper), but I'll save that for another day.

Have a great one!

Tami


February 16, 2010

New Cupcake Wrappers for Y'all....

I was playing with cupcake wrappers again. They are so fun for decorating your pretty little baked goodies. Here are some new ones.... enjoy!

Don't forget that this is just a thumbnail. To save the full-sized sheet, click on the thumbnail first and then save it from the bigger picture. It should print nicely at 8.5x11 inches.

How cute would these be for a bridal shower or even a birthday party? You can cut out (or use a paper punch) the circles, attach them to a toothpick and stick into the top of the cupcake frosting.


If you would like more wrappers, be sure to go to my Food Art Party blog. The link is on the right! There are many there.

February 10, 2010

CHEAP Fun New Crafts....

Just sharing some stuff that I made this week.

These are some Fuze drink bottles which I removed the wrapper from. I made the snowman head with a styrofoam ball. I cut a hole through the middle. Then I used brads for the eyes and made a nose out of fimo clay with a straight-pin head stuck in the back of it. I had to put the nose in crookedly so that it didn't put a hole in the straw! The snowflake in the fleece scarf is a brad also. I found this idea online. I want to say I found it at One Pretty Thing, but I can't remember!


Here's the new color of my craftroom walls! Pretty blue. It is called "Bottle Blue" on the Colorplace Paint Chip at Walmart. So CHEERY and PRETTY!!! Now, see this shelving on the left? I made a curtain to cover it (see below)...


These are some fabrics that I got at $1 a yard at Walmart. So pretty. I have no idea what I will do with them....


This was a pretty tray that my aunt gave me long ago. It had a crackle to it and a pretty hand painted design on the middle of the bottom, but I sat something hot on it and burned it. So, I painted it to match this toille fabric I put in the bottom. The design on the sides is stamped on with white ink. I cut the fabric about 1/4 inch bigger than the bottom of the tray...hemmed the fabric with a zigzag stitch, then coated the top and bottom with ModPodge. Then I sprayed it with a sealer. Now it is washable. I also sealed the painted parts. The edges were painted white and the bottom of the whole tray is painted black....althought you can't see it in this picture. This is going to sit on my table in me craftroom which I painted on Friday and Saturday (see below!)


Here is the curtain topper. This was actually a tab-top curtain to which I added fabric strips and ribbon. The flowers are made of paper and they are attached with flower brads.


This is my card display. I belong to a card group on YahooGroups which sends the most beautiful cards. I hate to put them away or throw them away, so I made some display space in my craftroom where I can honor my friends' hard work. I used a curtain rod from Dollar General and some little clips I got at Salvation Army (I've seen them at Walmart though)...

This is my other project I came up with. See the crate thing above, on my table? I have a set of those shelves that I put in my closet to store my 12x12 paper. They are nice for that. But there were some extra sections of shelving that I didn't know what to do with. So, I hot glued some dollar store cork board to it. I then put two nails in the wall that I can hang them on. I didn't like the nail heads sticking out of the corners, so I also hot glued those paper flowers/brads onto the nailheads. Whimsical & very cute!

Then, I also did the same thing under this curtain rod. But I hung the grids on the nails {also with flowers glued to them} and put some pretty, decorative binder clips on them so I can attach the cards to them .
Here's what they look like on the wall. The frame in the middle has some pretty wrapping paper in it. I also "wrapped" my tables in some black and white, heavy wrapping paper. It is the double-sided kind that you get at Hallmark, but I found it at the dollar store.

Oh.... and I made a Dark Chocolate Hershey's cake (from the back of the Special Dark Hershey's Cocoa box) with the icing recipe that is on there too.


I also made two boys' valentines for school. This is my 4th grader's valentine. There is candy behind the picture of my son.

My 1st grader's Valentine treats.
There are more, but I have to get to work and finish MY valentines!
Tami


February 6, 2010

Comments on Blogs


I love getting comments on my blog posts. I have so much fun reading them and then going to that person's blog to see what they do. I figure if someone took the time to comment on my post, they must like what I'm up to. On the flip side, I may also like what they've done on their blog. This is true most of the time.


Thinking about all of these great comments, I have to thank some lovely bloggers who always stop by and leave comments for me. They are always so sweet and I also go to their blogs and follow them because their stuff is so cute {or tasty!} too. If you like my blog, you should check them out and leave them some love in the comments. They really are great people.


Thank you ladies for making my day many times over!


Also, if you'd like to find a LOT of blogs to check out, you should go to The Secret is In the Sauce site. They post a blogger of the day for you to check out and then people leave comments on both the blogger of the day site and the SITs site. You will definitely find blogs you are interested there!


Hopefully I've given you a lot to read on this fine Saturday (especially if you are snowed in!)


Enjoy!

Tami


February 4, 2010

Mouse Pin Cushion and Cheese Scissor Case


I had a sick kid all week, so I had a lot of time to visit blogs. It was the best part of the week. I can't take credit for this idea. I saw it on a blog, but do you think I bookmarked that blog? Or maybe I did bookmark it, but can I find it again? NOOOOO...... So I can't even give a link back to the original idea. If I do find it again (I even googled it and can't find that post!), I will update this post.

Anyway, I saw this idea and thought that it was SOOOO cute. I've been looking for a pin cushion that appealed to me. Because I need one! When I saw this I melted. My mouse is different as I just made up how to make it, but the idea is the same as the original one I found.

Love how this turned out, but when I put pins in that little mouse, I feel like I can hear the voodoo magic making the mice our basement squeak!

Off to watch Project Runway!!!!

A New Site For Crafters

Have you seen the site, "You Can Make This?".... well, good news.... they have a sister site called DIY Dish. It is a series of videos that shows how to do all different crafts. I'm looking forward to seeing what they show.


Anyway, here is the link to it! Go check it out. The best part.... they are having a sewing machine giveaway. Not just one sewing maching, but TWO! I HOPE I win. I hope you don't!

February 2, 2010

Groundhog Day Cupcakes

These are becoming a tradition for Groundhog Day at our house! Aren't they cute? They are made using a Mounds bar, four brown M&M's, a red and white gumdrop, some candy eyes and some graham cracker crumbs for the "dirt" and royal icing to attach it all.

Cute {if not a little crazy-eyed } don't you think?

Tami

February 1, 2010

How to Make a Felt Valentine Door Stand-Up card

How CUTE did this turn out??? I saw this card in a magazine maybe a month or two ago. Theirs was different, but it inspired me to make one like it. I included a little tutorial below in case you'd like to try it yourself! Sorry, I don't remember the magazine. It is one a friend had with her. I want to say it was Today's Creative Home... :-(


I tried to show the "frost" on the windows in this picture, but it doesn't show up well because it is white on white, but it is pretty and sparkly in real life....
Okay, so what you need to make this card is....


1) 1 Sheet of patterned paper (to cover the chipboard back)


2) 1 Sheet of chipboard (any kind of heavy paper will do.... even the side of a cereal box)


3) 1 Sheet of pink felt


4) 1 Sheet of white felt


5) 1 Sheet of red felt


6) A heart shaped brad


7) Flower pot (you could make one using a stamp or just cut one out by hand)


8) Bush and flowers (use what you have!)


9) a sewing machine and white thread (you could sew by hand if inclined)


10) glue


11) white glitter


12) a button for the door handle


Step 1
Cut the chipboard to the size you would like your card to be. Mine is 5 in. x 6 in.

Step 2

Cut a "stand" for your card using the leftover chipboard. Mine is 2 inches across the top and 3 inches across the bottom. I made the stand about 1/2 in. shorter than the card so the card will lean back. So, the stand is 4-1/2 inches high. (See the picture)


Step 3

Cut two pieces of the patterned paper to cover the front and back of the chipboard background. Also cut patterend paper to cover the stand. Glue all pieces into place. No chipboard should show.

Step 4

Cut the white background felt for the windows and door. These should be approximately 1-1/2 inches wide x 5 inches high for the windows and 2-3/4 inches wide x 5 inches high for the door.

Step 5

Cut the red felt for the doors and windows. I cut each of these approximately 1/4 inch smaller than the white pieces. So, the windows should be 1-1/4 inches wide and 4-3/4 inches tall

The door is 2- 1/2 inches wide by 4-3/4 inches tall.

Step 6
Cut the pink for the doors and windows. Again, make them 1/4 inches smaller than the red.

Step 7
Cut the little squares for the door. I did 6 that are 3/4 inch x 3/4 inch.
Step 8
Cut the Whites for the windows and doors in the same fashion. The windows should be about 1/4 inch smaller than the pink you cut out. The door window on the top was just eyeballed. I halfed a piece of felt and cut an arch and cut it down until it fit. The width of that at its widest is about an inch and a half.

Okay... now you have your pieces cut out, it is time to start sewing. The main thing to remember is that it gets pretty thick so you should do it in parts.


Step 1

Sew the reds to the white backgrounds first. Be sure to sew fairly close to the edge so that your stitches show nicely. I had to trim some of my felt to make it fit better.

Step 2

Sew the small pink squares and the white windows to the windows and door. Now sew horizontal lines on the white side windows to create window panes.

Step 3
Sew the pink door and windows to the red and hand-sew the button door knob onto the door.

Now you are ready to assemble the whole thing!

Glue the door and windows to the card. I use crafting glue and it sticks just fine. Make a heart from your leftover scraps of red felt and put the brad through the middle of it. Glue the red heart to the door. Add white glitter to the panes of glass on the windows (including the door).
I used Karen-Marie's Laser Cuts (see below) topiaries in front of the dooor. I used pop-dots to put the flowers on the bushes and I painted over the orange flower pots with some Sparkling H2O's to make them look more pink and thereby match the door. Not everyone will be able to find these laser cuts. I found them at our dollar store (!!!) for $1! If you have a flower pot stamp and some flowers, you could make your own cut outs. I then attached them to the card using pop-dots.
Now just glue the stand to the top of the back of the card (align it with the top) and you are finished! Now give it to your Valentine's Day SWEETIE!
Have fun!
Do you want to see other crafty blogs? There are hundreds at these two links. Great ideas! Great inspiration!


get inspired button
Tami


Blog Widget by LinkWithin

Past Posts

FEEDJIT Live Traffic Feed